Home Golf Simulator Buying Guide: What You Actually Need to Get Started
Every home golf simulator needs four core parts: a launch monitor, impact screen, enclosure, and hitting mat. This buying guide explains what each one does, behind-ball vs side-on launch monitor types, GSPro/E6/Awesome Golf software compatibility, and when to buy a bundle vs piece by piece.
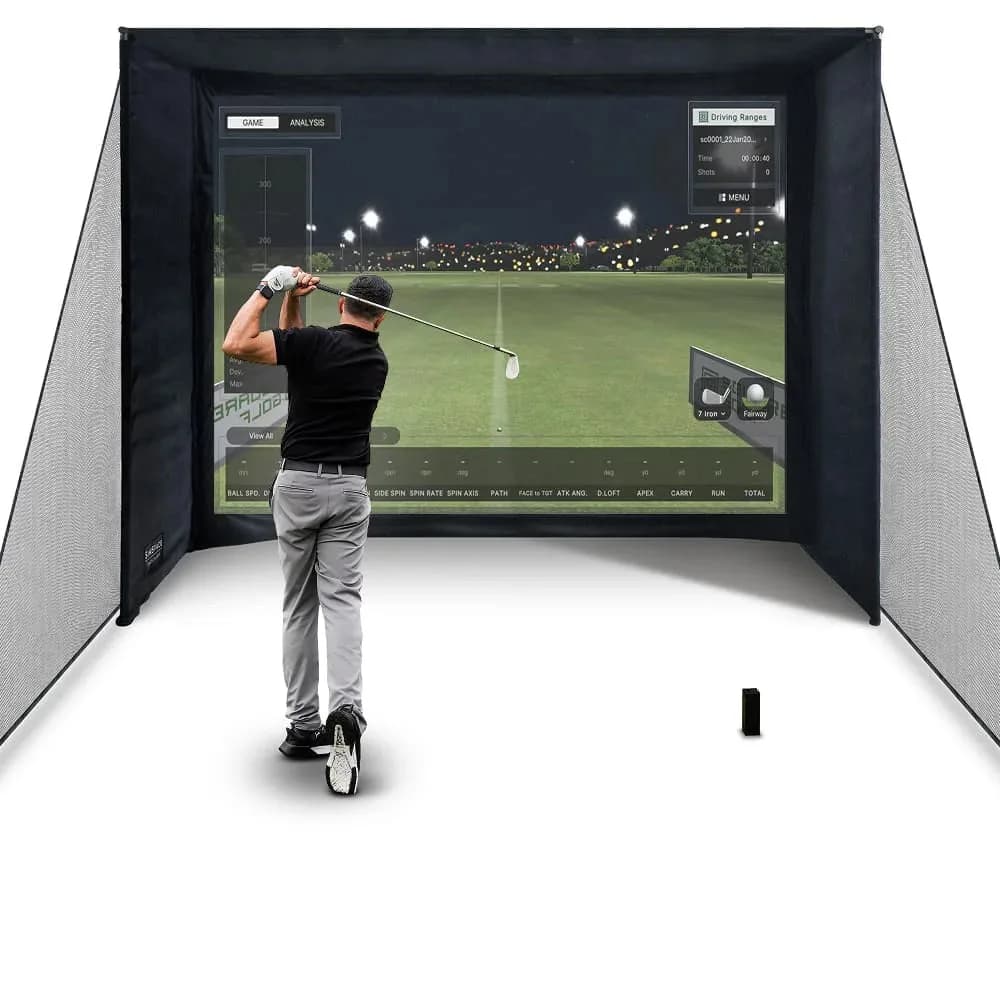
What is a home golf simulator?
- What is a home golf simulator?
- The 4 core components every home golf simulator needs
- Behind-ball vs side-on launch monitors
- Golf simulator software: GSPro, E6 Connect & Awesome Golf
- Bundle vs piecemeal: two ways to buy your first setup
- Common mistakes first-time buyers make
- Getting started: your first home golf simulator checklist
A home golf simulator combines four core parts (a launch monitor, an impact screen, an enclosure, and a hitting mat) to turn a garage, basement, or spare room into a space where you can track real swing data and play virtual courses year-round.
If you're researching your first setup, the hardest part isn't finding a product to buy. It's understanding what each component does, how they work together, and which decisions actually matter versus which are just marketing. This guide walks through the fundamentals so you can shop with confidence, whichever brand or bundle you eventually choose.
Every home golf simulator needs a launch monitor, impact screen, enclosure, and hitting mat: the rest is preference.
If you're brand-new to home golf simulators, start with the four core components below, then decide whether a pre-built bundle or a piece-by-piece build fits how you shop and the space you have available.
Check Current PriceKey Highlights
- The four parts every home golf simulator needs, and what each one actually does.
- Why launch monitors split into behind-ball and side-on designs, and which suits tighter rooms.
- How software like GSPro, E6 Connect, and Awesome Golf changes what you can play.
- When a pre-built bundle beats buying components separately.
- The mistakes that cost first-time buyers the most money and floor space.
What is a home golf simulator?
A home golf simulator is a self-contained indoor setup that captures your swing and ball flight with sensors, then projects the result onto a screen so you can play a virtual course or run practice drills. Unlike a driving range visit, it works in any weather, at any hour, inside a dedicated room in your house.
Interest in the category has grown alongside golf participation more broadly. The National Golf Foundation reports that more than 48 million Americans hit golf balls with a club in the past year, across both traditional courses and off-course formats like simulators and tech-enabled ranges. Indoor simulators are one of the drivers behind that growth, because they remove the two biggest barriers to practice: weather and daylight.

Owners tend to use these systems more than they expect to. In a survey of simulator owners, 68% used their simulator more than 10 times per month, and 88% said their launch monitor improved their game, with an average reported drop of 5.27 strokes. That regular-use pattern is worth keeping in mind when you plan your space and budget. A simulator built for occasional use often gets outgrown fast.
The 4 core components every home golf simulator needs
Every home golf simulator setup, regardless of brand or price tier, is built from the same four core components: a launch monitor, an impact screen, an enclosure, and a hitting mat. Understanding what each one does is the fastest way to compare bundles and avoid paying for features you don't need.
Launch monitor: the brain of your simulator
The launch monitor is the device that actually measures your swing (clubhead speed, ball speed, spin, launch angle, and carry distance) using camera and/or radar technology. It's the single component that determines how accurate and detailed your data will be, and it's usually the biggest line item in any bundle.

Impact screen: where the course comes to life
The impact screen is a multi-layered fabric surface that both displays the projected course and absorbs the physical shock of a struck ball. Screens range from simple single-layer practice nets to reinforced multi-layer designs built to withstand thousands of strikes while reducing noise and keeping the projected image sharp. A cheap, thin screen wears out fast and gets loud; a properly layered one is a durability decision, not a cosmetic one.

Enclosure: containing the swing safely
The enclosure is the steel-framed net structure that surrounds the hitting area, containing stray shots and protecting the room around it. Enclosures come in multiple width, height, and depth combinations so you can match one to your ceiling height and floor space rather than the other way around. This is covered in detail in our golf simulator space requirements guide.

Hitting mat: the surface you actually strike
The hitting mat is the shock-absorbing turf surface under your feet and ball. It protects your floor, supports the launch monitor's ball-detection sensors, and needs enough surface area for a full, unrestricted swing. Most standard mats measure around 1.5m by 1.5m, with slimmer options available for tighter rooms.

Behind-ball vs side-on launch monitors
Launch monitors fall into two positioning categories, and the choice affects both your data and your floor plan. Behind-ball monitors sit behind you, facing the target, and capture ball impact data from that vantage point. They generally suit tighter spaces since they don't need extra side clearance. Side-on monitors sit to the side of the golfer instead; some golfers prefer this placement for club-path and face-angle data, but it does require additional lateral room.
Neither type is objectively "better". The right one depends on your room shape and what data matters most to you. If your space is narrow, a behind-ball unit removes one variable from your setup. If you have width to spare and want side-on metrics, that option opens up too.
Accuracy is a fair question for either type, and the independent testing data is reassuring. In controlled testing, one widely used camera-based launch monitor showed a total average deviation of just 1.14% across key metrics compared to reference equipment, with ball speed variance around 0.36%. A separate peer-reviewed reliability study found a comparable radar-based system delivers excellent within-session reliability for clubhead speed and ball speed across repeated swings. In plain terms: modern home launch monitors, at both price points, are measuring your swing more consistently than most golfers assume.
Golf simulator software: GSPro, E6 Connect & Awesome Golf
Your launch monitor is only half the experience. The software is what turns raw swing data into a playable round. Many home launch monitors are compatible with third-party platforms including GSPro, E6 Connect, and Awesome Golf, each offering its own course library, graphics style, and game modes. Some launch monitors also ship with their own proprietary app and mobile-first game modes (driving range, closest-to-pin, putting practice) rather than relying on third-party software at all.
Before you buy, check which software your shortlisted launch monitor actually supports. This is one of the few decisions in a home golf simulator build that's genuinely locked in once you've committed to a device. An open-architecture launch monitor that works with GSPro, E6, or Awesome Golf gives you more course variety and future flexibility than a closed system tied to one proprietary app.
Bundle vs piecemeal: two ways to buy your first setup
There are two practical strategies for assembling a home golf simulator. Pre-built bundles package a launch monitor, enclosure, impact screen, and hitting mat together, optimized for compatibility and often including an installation guide or bonus accessories. Individual component purchasing suits golfers who already own a mat or enclosure, or who want to size and mix specific parts to their room and preferences.
Bundles are the more common entry point, mainly because compatibility is solved for you. The launch monitor, screen, and enclosure are matched to work together out of the box. Many golfers start with an entry-level bundle to confirm they'll actually use a simulator regularly, then upgrade individual pieces (a heavier-duty screen, a bigger mat, a more precise launch monitor) as their needs become clearer.
| Approach | Best for | Trade-off |
|---|---|---|
| Pre-built bundle | First-time buyers who want guaranteed compatibility | Less control over individual component choice |
| Individual components | Golfers with existing gear or specific room constraints | You own the compatibility research |
| Bundle now, upgrade later | Golfers unsure how often they'll use it | Requires buying twice on the parts you outgrow |
As a rough map of the market: entry-level bundles pair a compact behind-ball or infrared launch monitor with a basic enclosure and screen. Mid-range bundles step up to more sophisticated side-on launch monitor technology, sturdier steel enclosures, and access to fuller software course libraries. Premium-tier bundles add dual-camera or Doppler-radar launch monitors, larger enclosure footprints, and the most durable screens, typically chosen by serious golfers or instructors using the setup for coaching. None of these tiers has a fixed price you should expect to see everywhere; always check current pricing directly with the vendor.
Common mistakes first-time buyers make
Most regrets in this category come from a handful of predictable mistakes, not bad luck. Knowing them ahead of time is the fastest way to avoid an expensive redo.
- Buying the launch monitor before measuring the room. Side-on monitors need lateral clearance a behind-ball unit doesn't: measure first, choose the monitor type second.
- Assuming a thin practice net will hold up long-term. Entry screens are fine for casual, occasional use, but a daily hitter will wear through a single-layer screen faster than expected.
- Ignoring software compatibility until after purchase. Not every launch monitor works with GSPro, E6 Connect, or Awesome Golf. Confirm this before you buy if course variety matters to you.
- Underestimating how often you'll actually use it. With most owners hitting balls more than ten times a month once they own a simulator, buying the cheapest possible screen and mat can mean replacing them within a year.
- Skipping the hitting mat upgrade. A mat that's too small restricts your natural swing and can throw off the very data the launch monitor is trying to capture.
Getting started: your first home golf simulator checklist
Once you've chosen your components (or a bundle), setup is more approachable than most first-timers expect. A typical entry-level bundle takes roughly 20–30 minutes to assemble with two people, covering the enclosure frame, screen mounting, hitting mat placement, and launch monitor connection. Most bundles ship with a step-by-step installation guide, so no specialised tools or trade skills are required.
- Measure your room's width, depth, and ceiling height before choosing an enclosure size.
- Decide between a behind-ball or side-on launch monitor based on your available lateral space.
- Confirm the software (GSPro, E6 Connect, Awesome Golf, or a proprietary app) your shortlisted launch monitor supports.
- Choose a bundle if you want guaranteed compatibility, or build piecemeal if you already own components.
- Set aside about half an hour with a second person for assembly.
If you want a complete, ready-to-assemble starting point rather than sourcing components separately, Simspace Golf bundles a launch monitor, enclosure, impact screen, and hitting mat together as a matched set.
Where to go next
Now that you know the four core components, the launch monitor types, and how bundles compare to piecemeal builds, your next step depends on where you are. Working out how much room you actually need? Read our golf simulator space requirements guide. Ready to compare a specific bundle brand in detail? See our Simspace Golf review for launch monitor and enclosure options by price tier.
References
More Golf guides


